You’ve probably made the decision to upgrade your bike’s controller and want to know the best settings to program your controller with.
in this post, I will share with you my personal experience of how to set up an ebike controller also I will share information about the most popular ways to set up your ebike controller using an LCD display screen.
Now let’s set up your ebike controller.
As a general rule, you can set up your ebike controller using your ebike LCD display screen.
In the below lines, I will explain the difference between the parameters of the most Popular ebike controller LCD screens.
Popular ebike LCDs
1- Ebike KT-LCD 3.
KT-LCD3 is one of the most popular ebike LCDs in the market & has been used by a lot of ebike riders
This LCD has three main screens that give you different information about your ebike, also it has a screen for advanced options where you can set up your controller & ebike setting.
First KT-LCD 3 Screen.
Once you turn the screen on by pressing the middle button you will see the first screen.
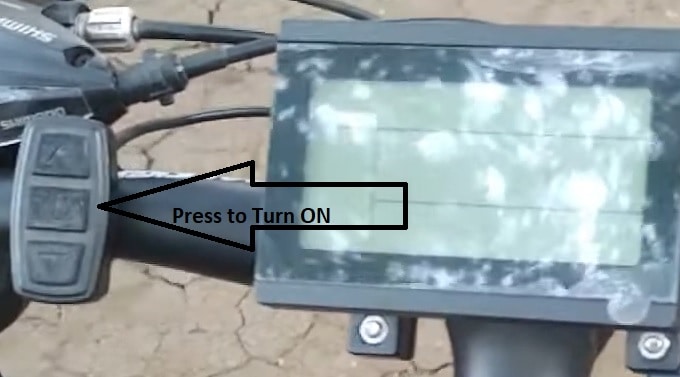
Steps:
1- If you turn the screen on and directly hold the button below you will activate the walking mode where your ebike motor will start working automatically & you will see a person symbol on the screen.
2- Pressing & holding the up botton will turn on LCD lights.
Once you turn on your ebike LCD you will see the first screen information which shows you the battery levels, PAS (Pedal Assist System), speed reading, distance, motor temperature, and motor wattages. (see the below photo)
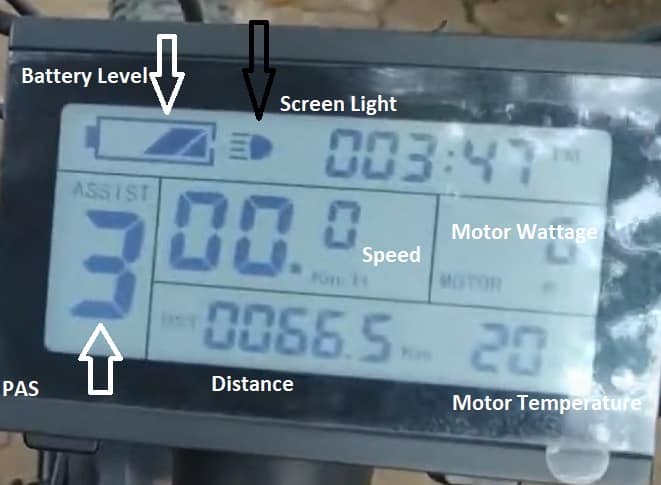
Ebike Trick: the distance meter is a trip distance meter which you can reset by holding the up & down button at the same time while you are on the main screen, once the screen starts to flash press the middle button to save the reset.
Note: this trick will reset the trip counter but the odometer will still count your ebike distance & there is no simple way to reset the whole ebike distance.
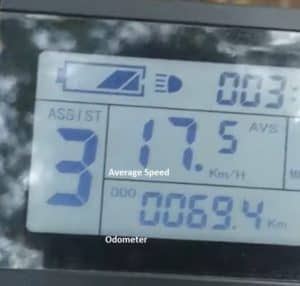
Second KT-LCD 3 Screen.
press the middle button one more time to move to the second information screen.
this screen still has some information from the main screen however it shows you the average speed and the odometer information.
Check out this Ebike LCD Display Meter KT-LCD3 24V 36V 48V on Amazon
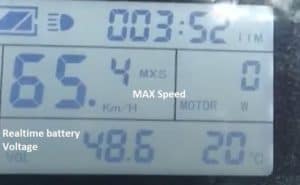
3) Information screen:
the third screen will give you additional information about the maximum speed that has already been set by default and also the real-time battery voltage.
Setting up the main Ebike Controller configurations on KT-LCD3
After checking the information shows in the three screens you can now start adjusting some configurations.
Adjusting Maximum Speed Limit on your ebike
- Turn OFF ebike LCD & then turn it ON
- Press & Hold UP & Bottom buttons
- the maximum speed limits will start flashing
- set it to the maximum speed you want based on your motor capacity
- Save the configuration by press the middle button.
Adjusting Tire Size settings:
- Turn OFF ebike LCD & then turn it ON
- Press & Hold UP & Bottom buttons
- the maximum speed limits will start flashing
- Press the MIDDLE BUTTON again to move to the tire setting
Note: the tire setting is very important as it will affect the speed readings
Ebike Trick: based on my experience with this screen try to increase these settings by two inches than your actual tire size.
For example: if you have a 24-inch tire then your idle setting should be 26 inches.
Adjusting Distance reading & Temperature
- Turn OFF ebike LCD & then turn it ON
- Press & Hold UP & Bottom buttons
- the maximum speed limits will start flashing
- Press the MIDDLE BUTTON two times to move to distance reading & Temperature.
- change the setting as you preferred then press the middle button again to save.
in these steps, you will make two changes with one press meaning that if you choose mileshour this will also change the temperature Fahrenheit or if you keep pressing it will set the speed reading to KMHr & temperature to celsius
So, be aware that you can do double changes at once in this step.
Advanced settings.
To go to advanced setting in ebike
- Turn OFF ebike LCD & then turn it ON
- Press & Hold UP & Bottom buttons
- the maximum speed limits will start flashing
- Press the middle button
- Press & Hold UP & Bottom buttons again then the P1 parameters will start flashing
below is a detailed explanation for the P & C parameter according to the manufacturing manual
P parameters
P1: This value means motor characteristics parameters which include info about voltage, frequency & how your motor will perform with every value.
P2: This means the control for your Speed sensor if you doubt that you have an issue with the speed sensor so better to check the default value in your manual.
P3: this parameter controls your PAS or Pedal Assist functions usually it has values from 0 to 5
Zero means that you will depend on the PAS system completely
Five Means that you will depend on the throttle power completely
P4: Control the throttle startup and it has two values 0 Or 1
Zero Means that the throttle will activate the motor when it is triggered.
One: This means that the throttle will not activate the motor unless you pedaling first.
P5: This means how your controller will monitor your motor & battery recommended not to mess around with
these settings because if this value wasn’t set correctly you won’t be able to get correct info about your battery
charging levels. (by default it will be set to 0 & this value will show the real-time voltage mode).
Now let’s move to the C parameters
C1: setting for the throttle starting up Settings you need to check your manufacturing manual to set your preferred manual settings
C2: is your motor classification code which is usually used if you have a scene wave drive motor
C3: Controls the power assist ratio gear usually have values from 0 to 5
Zero: Almost no Pedal assist from the motor
Five: the Highest Pedal Assist from the motor
C4: This parameter is used to set your e-bike handlebar
C5: This parameter is responsible for the maximum operating current & as we mentioned you can use this to reset your controller. please make sure to check your e-bike manual before changing any value.
C6: this parameter controls the backlit light LCD display usually is have five values from 1 to 5 one is the low brightness & 5 is the highest.
C7: cruise function settings (if your control has cruise function) 1 for ON & zero to switch it OFF
C8: this parameter will show the motor temperature settings
C9: setting for setting up a password for your function panel
C10: The factory reset settings (this with the reset the whole settings to the factory reset) if you want to reset all the settings all you need to do is to choose Y and Save it.
C11: used for LCD attribute setting usually is have values from 0 to 2
C12: this will set the minimum operating voltage (better to leave this option as it is )
C13: This parameter controls your ABS Brakes settings
C14: Is the power Assist tuning setting you can choose either 3 which is the highest or 1 is the lowest.
2- Ebike KT-LCD8H
KT-LCD8H is the upgrade version of the KT-LCD3 which adds more features & a way more organized setup.
Also, it’s a color screen which is much better.
kt lcd8hu display for ebike On Amazon
3-Ebike S866 LCD.
The S866 LCD display is mainly designed for Lankeleisi electric bikes however I saw some people who bought it for different types of bikes.
Looking for a new S866 LCD check it out on Amazon
To turn your S866 LCD press the power button for 2 Sec.
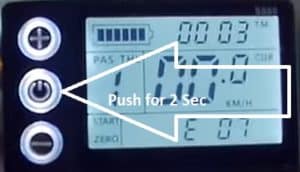
The LCD has three information screens with less information compared to KT-LCD3
the first Screen is the current speed & PAS
The second is the average speed screen
The third is the Maximum speed screen
To Go to the Parameter screen you need to hold the + & – Button for 2 sec then the P1 value will start flashing.
P1: is the value for the background lights you can increase or decrease it using the +- buttons and it has three modes from 1 to 3 where 1 is the lowest & 3 is the maximum.
To save the settings click on power buttom
P2: is the value for distance unit KMMiles where 0 isKM & 1 is the miles.
P3: is the battery voltage level you need to set it the same as your battery voltage.
P4:is the LCD sleeping mode & it has two values of 0 means no LCD Sleeping Mode or set it to 1 then set the timer from 1-60 Min.
P5: is the setting for Power assist mode it has two values the 0 & 1 where 0 means three levels & 1 Means 5 levels.
P6: is the settings of tire size
P7: is the motor setting related to the number of speed magnets you can calculate this value by multiply the number of magnets * reduction ratio if you are not sure what is the setting of your motor? check your manufacturing website for accurate info.
P8: is the setting of maximum speed
P9: is the setting of a startup that has two values The 0 value means no assist during startup & 1 means startup with an assist.
P10: is the setting of throttle mode has two values 1 is for throttle drive & 2 for a pedal-assist drive.
P11:Posting sensitivity settings
P12: Boosting start strength settings
P13: Numbers of magnets on the pedal-assist desk.
P14: maximum current for ebike controller.
P15: Controller Undervoltage value which means when the controller is turned off in case of the battery reached a low voltage level this acts as a second safe system after the battery BMS.
P16: is the setting to clear the odometer value, you can reset it by holding the + button for 6 Sec.
P17: is for cruise feature 0 is off & 1 is On
P18: is the speed ratio adjustment it has three values, 50%, 100% 150%
P19: Gear setting 0 means disabled & 1 Means enabled.
Errors Code for Ebike S866 LCD
| Code | Error |
| 2 | All Brakes related errors |
| 3 | Power sensor failure |
| 4 | Cruise Errors |
| 5 | |
| 6 | Battery under-voltage errors |
| 7 | Motor failure |
| 8 | Throttle Error |
| 9 | Controller failure |
| 10 | Communication errors |
| 11 | |
| 12 | BMS failure |
| 13 | Headlight |
Useful Resources.
How do I Reset my EBike Controller? (Solved) This post shows you how to rest your ebike controller.
How To Test An EBike Controller At Home? (Explained) This post shows how to test your ebike controller at home with a multimeter in a simple way.
Conclusion
I had listed three different models of ebike LCD screens so you can have a good idea of how to configure your ebike controller using the same methods mentioned in this post.
One Final Tip: Always check the manual of your ebike controller, LCD screen, or ebike manufacturing to know the accurate information related to them.