Bafang motors are considered one of the most popular bike motors for conversion kits, and this is because they have many advantages in relation to the price and good performance in the small to medium category.
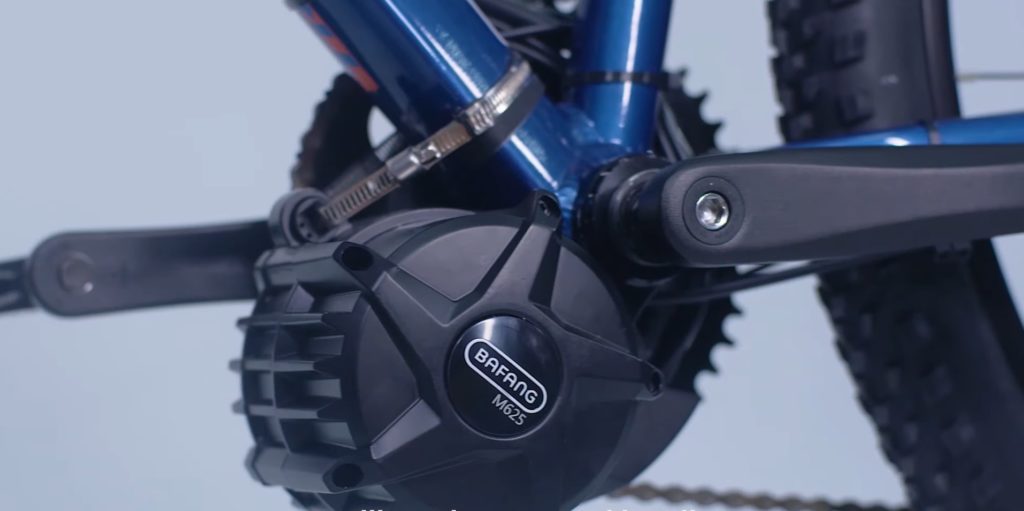
The M625 motor is a relatively recent motor in the Bafang group. It is a 1000-watt motor and comes with its conversion kit, a 52 v 19 AH battery, which is a large battery in capacity and size as well!
In this post, we will explain how to install the conversion kit M625, which is not very different from the method of installing the Bafang BBS02, and the difference is due to some improvements and sizes that have changed in the M625.
What you should consider in the M625 conversion kit?
Before we get into how to install the M625, let’s take a look at some important information you may need before thinking about installing the M625 on your bike.
1-The upper area of Downtube.
As we mentioned in the introduction to this post, the size of the battery that comes with the conversion kit is relatively large, which forces you to have sufficient space in the upper area of the downtube.
Bafang’s recommendation for this point is that the Motion Range be 390 mm in length and that there should be a height of 170 mm.
Tip: If the frame size of your bike does not fit Bafang’s recommendations, you can put the battery on a rear rack and there will be no obstacles, especially since the motor has a capacity of 1000 watts.
2- No shift Sensor comes with the M625 conversion kit.
The shift sensor is one of the things that are no longer present in the Bafang M625, and the function of this sensor is to cut the electric current off the bike in case of the gears shift in order to not put more pressure on the chain and ease the shifting process.
Note: in the last section of this post we will explain a hack so you can install the shift sensor on this kit.
So stay with us till the end!
3-You will not be able to change the motor parameters.
One of the things we are used to in the Bafang BBS02 motor is that you can reprogram the motor, its movement and almost everything in it to suit the way you ride the bike, but the matter here is different, as so far there is no easy way to reprogram the M625 Bafang motor
4- Bottom Bracket Sizes.
This motor comes in sizes for the Bottom Bracket, which is 68, 73, and 100, which means that it does not come in the 120 mm size suitable for large bikes.
What you will find in the box of A Bafang M625 Kit?
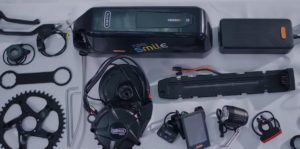
After we have explained the most important information that may interest you about the M625 motor, we will take a quick look at what you will find inside the box
- Bafang M625 Motor.
- Brake Levers
- Throttle
- wiring harness
- DPC full-color display
- 42.6 chain ring
- ebike Battery (SAMSUNG cells)
- Cranks
- Locking Nuts.
- Speed Sensor.
- Shift sensor.
- Hydraulic brake sensor
- Bafang Tool.
- Headlights.
- Taillights.
What are the tools you need to install Bafang M625?
Below are the tools that you will need to install Bafang M625 conversion kit.
- 15 mm wrench
- Crank puller
- Allen Keys
- Bottom bracket extractor.
- Chain removal tool.
- Star Bit.
- Bafang tool.
- Screws
How To Install M625 Bafang Motor?
In this part, we will explain how to install the Bafang 625 Conversion Kit.
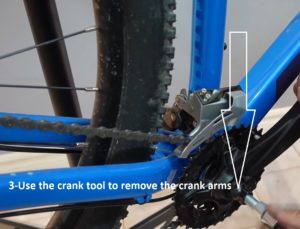
1- Remove the Pedal.

2-Using Allen Key remove the crank bolts

3-Use the crank tool to remove the crank arms.
4-On the non-riding side remove the bottom bracket using the bottom bracket tool. (Clockwise)

5-On the riding side remove the bottom bracket using the bottom bracket tool. (Counter-clockwise)
6- Using Allen Key remove the front Derailleur (if exist)- you will need to cut the chain using the chain tool then reattched it.

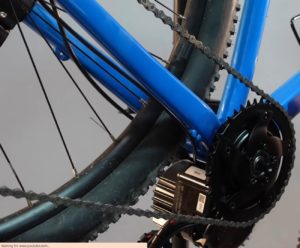
7- Attach the Motor to the bottom bracket & Make sure it’s close to the down tube.

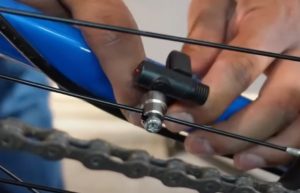
8-put fixing tube on the downtube of the moter& tighten it using the Allen key.
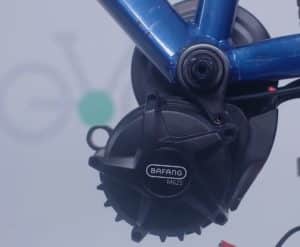
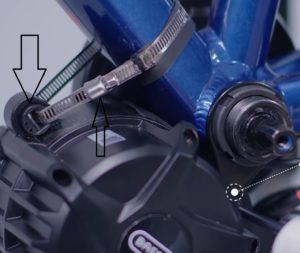
9-Raise the motor to the highest position then install the Hoop then tighten it with the screw.
10- Attach the chainring & tighten its screws using the Allen key.
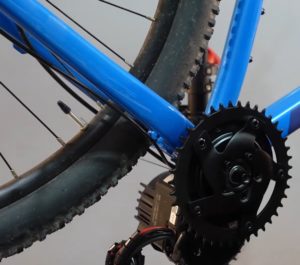
11- Attach the chain to the chainring.
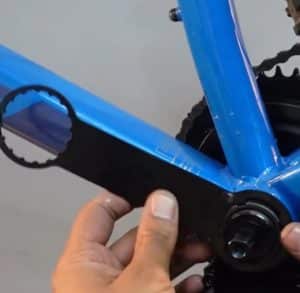
12- On the riding side attach the crank arm using Allen Key.
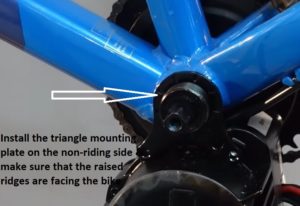
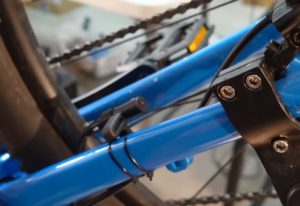
13- Install the triangle mounting plate on the non-riding side & make sure that the raised ridges are facing the bike.
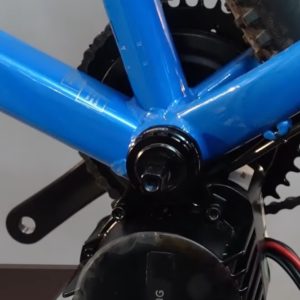
14- Using the Bafang tool install the inner lockring.
15- Using the Bafang tool install the outer lockring.
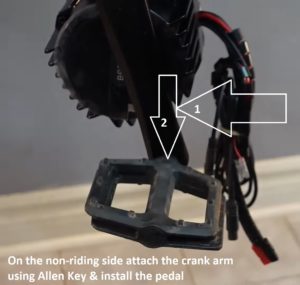
16-On the non-riding side attach the crank arm using Allen Key & install the pedal.
17-Install the speed sensor magnet on one of the spokes & make sure that the smooth side is facing the speed sensor.
18-Attache the speed sensor cable.
19- Remove the handlebar grip.

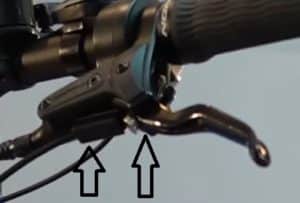
20- Using Allen Key remove the brake lever & the gear shifter.

21- Install the throttle & the brake lever.

22- Attach the display screen & the control pad to the handlebar.
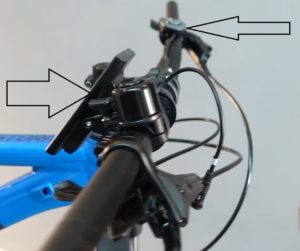
23-Reattach the shifter & the grips.
24- Connect the main wiring harness cable & make sure to line the arrows up on the plug.

25- Connect display, brake lever, and throttle (every plug has its own color so, follow the colors to connect the plugs)

26-Install the brake sensor & connect its cable. (make sure that the magnet is close to the brake lever)
27- turn the battery key so you can remove the battery cradle (the battery should be fully charging so you can test it after completing the installation)
28- attach the battery cradle to the bike frame & make sure it’s in a low area in order to be able to remove the battery easily.

27- Attach the battery to the ebike & get ready for testing.
Q&A About Installing Bafang BBS02
How long it will take to install Bafang BBS02?
As a general rule, you can install the Bafang M625 in a time of one and a half to two hours if you have all the tools.
How to install the gear Shift sensor on the Bafang M625 KIt?
As a general rule, you can add a gear shift sensor to the Bafang M625 kit by attaching the gear shift sensor to the bike and then using a splitter from the brake lever.
by this method, you can use the same electricity line that is dedicated to the brakes to be used by the shift gear sensor.
Full Details in this Post “How Do You Install Gear Sensor? (Front & Rear)”