How To Test Ebike Hub Motor? f your electric bike is powered by a hub motor, you’ve probably asked how to test it, and this question is very important for two reasons.
The first reason is that the price of the motor is not cheap, about 200 to 500 dollars, depending on the wattage.
The second reason is the lack of bike shops that accept the maintenance of the Hub Motor.
With regard to the few bike shops that accept the maintenance of the hub motor, unlike the mid-drive motor, the reason for not accepting the shops is that most electric bike manufacturers now manufacture bikes with the mid-drive motor, so it is easy for the electric bike shops to contact the factory to obtain additional information for maintenance.

Therefore, in this post, we will try to explain how to do a hub motor test at home in order to be easy for you to determine the type of problem in the hub motor, and therefore you can solve it at any shop that repairs electric motors, not just an electric bike maintenance shop.
What are the most common issues in Hub motors?
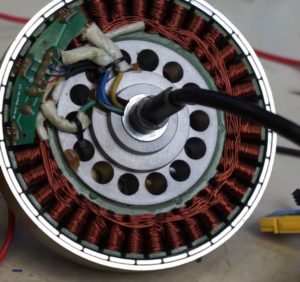
As a general rule, there are two common problems in the hub motor, which are the problem of the phase wires and the problem with the hall sensors.
Hall sensor problem: It is caused by either a problem in the wire connected to the sensor or in the sensor itself.
Phase wire problem: It is caused by an internal cut in the wire or in the jack itself.
In the next part of the article, we will explain how to test the Hub Motor in terms of phase wire testing & hall sensors testing.
How To Test Phase Wire On ebike Hub Motor?
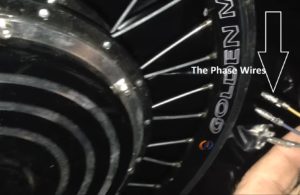
The phase wire test in the hub motor is one of the easiest tests that can be performed to ensure that the wires are able to conduct an electrical current.
And the steps are as follows:
- Take off the wheel that the motor is attached to and put it on a stand so that you can turn the wheel manually.
- Hold the phase wire without them touching each other
- Turn the wheel with your hands to see if the wheel can spin easily.
- Touch two ends of the wires and leave the third and then try to spin the wheel if he notices that the wheel cannot be turned easily. This is evidence that these wires work well.
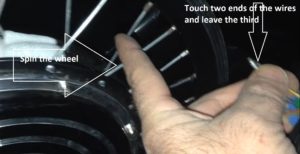
5. Touch the third party with one of the previous wires and try to spin the wheel.
6. Touch the remaining two wires and spin the wheel.
Note: This test is done without connecting the battery because the motor produces force with rotation
How To Test Hall Sensors On ebike Hub Motor?
Hall sensors are one of the most common parts that can be damaged in a hub motor and cause the motor to stop working.
In this part, we will explain how to test the sensors and also how to change them.
But before we start, you should know some important things about the hall sensors, which will make it easier for you to determine whether the problem is in the sensors or not without even testing.
What will happen when one of the hall sensors failed?
As a general rule, when one of the hall sensors in the hub motor is damaged, you will hear a vibrating sound without any movement from the motor.
Why do Hall sensors fail?
The main reason that leads to damage to the hall sensors in the hub motor is the high heat produced by the motor, which may exceed the temperature that the sensor can withstand.
Therefore, it is always recommended to buy hall sensors that are manufactured to withstand high temperatures.
Now that we know the causes of damage to the hall sensors and the most famous sign of damage to the sensors, let us start with how to test the hall sensors in the Hub Motor and also how to replace them.
How To Test Hall Sensors On ebike Hub Motor using Multimeter?
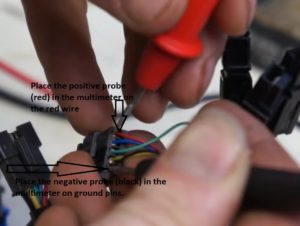
The first method of testing, which is considered cheap, is to use the multimeter to measure the voltage of each sensor. In order to know that the sensor is working, the reading must be either positive or zero while the motor is running.
For example, when you start the measurement with the multimeter, you will see a positive reading on the multimeter, but with the motor rotating, the reading will be zero, and this depends on which magnet is opposite to this sensor.
Check Out this amazing multimeter on Amazon I love it & I think everyone should have one
Note: the reading must be constant, for example, if the reading is 4, it will remain 4 every time the reading is positive. But if you notice that the positive reading is 4, then 5 or 2, this is evidence of damage to the sensor.
- Take the motor off the electric bike.
- Put the motor on a stand so that you can roll it.
- Place the negative probe (black) in the multimeter on ground pins.
- Place the positive probe (red) in the multimeter on the yellow wire.
- Roll the motor with your hand slowly and see the reading on the multimeter.
How To Test Hall Sensors On Hub Motor using ebike testing machine?
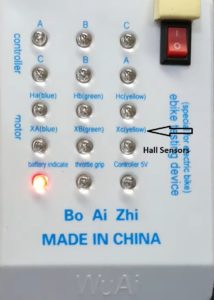
The second way to test the hall sensors is by using the electric bike tester, which you can get from Amazon, and the way to use it is very easy, as there are 3 flashes for 3 sensors.
All you have to do is connect the motor cables to the tester and then slowly start winding the motor with your hand
I noticed that there is a lamp that is fixed all the time or is off, this indicates that the sensor is not working.
Check out the ebike testing device on Amazon
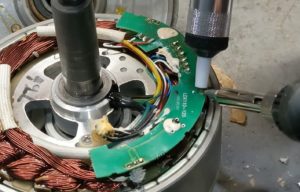
How to replace Hall sensors on Hub motor?
After determining that one of the three sensors has a problem, you have to replace the damaged sensor, and this step may seem difficult, but in fact, it is simple, but you need several tools to help you
Tools:
- screwdriver.
- soldering iron.
- New hall sensor.
1- Using the appropriate screwdriver for your motor model, remove the outer cover of the motor.
2- After identifying the damaged sensor, remove it using a soldering iron.
3- Install the new sensor, noting that the installation is done in the same direction as the old sensor (in the case of Turkey, the sensor will not work in reverse)
4- Using the soldering iron, install the new sensor.
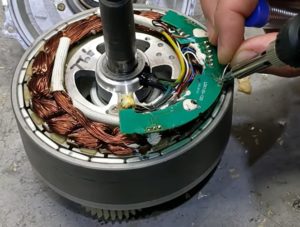
5- Do the test again to make sure that all the sensors are working
6- Close the outer cover of the motor.
Conclusion.
As a general rule, you can test the hub motor using a multimeter or an electric bike tester and make sure that the phase wire and hall sensor are working efficiently.
Useful resources.
Why Does My Electric Bike Keep Cutting Out? (Fixed)