Welcome To Electric Bike Tricks
As long as you have researched how to test the controller for your electric bike at home, you most likely have a problem with the ebike and suspect that the cause is the controller or trying to make sure that your electric bike controller is working properly.
So in this post, I will share with you the correct way to test the ebike controller as well as some useful information that you should know as long as you decide to test the controller at home.
“If your electrical information is limited, do not worry, I will share the information with you in a very simple way”
First, let us know What are the components of the Controller and how does it work?
Ebike Controller Component
As I promised, I will simplify the information for you. The controller is exactly like the brain in the human body.
Same like the brain communicates with all parts of the body through nerves, the controller of your ebike, uses wires to communicate, the electrical signals, and send the power required for each part of the ebike.
There are mostly 9 wires that come out of the controller and are connected to your bike’s parts. Let’s start with knowing these wires before you start testing them.
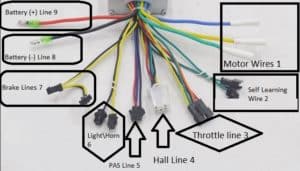
- Motor Lines are responsible to send the power to the Motor after receiving it from the battery.
- Self Learning Lines are responsible for ensuring that the connections between the motor lines and hall sensors and the controller are in the correct connection positions.
- Throttle lines are the connections between your ebike throttle & controller. it’s responsible for sending & receiving the order from throttle to motor through the controller.
- Hall Lines are responsible for detecting the hall sensor in the motor in order to inform the controller whether the motor is OnOff.
- PAS Lines are the Connections that detect your PEDAL Assist System and transfer the power to it.
- LightHorn Lines for transferring the required electricity to your ebike light or horn.
- Brake Lines are responsible for receiving the order from your brake to stop the ebike.
- Batter Line (-) is the negative part connection that goes into the battery.
- Batter Line (+) is the positive part connection that goes into the battery.
How does the ebike Controller Works?
As we had mentioned earlier the controller is the brain or if you wish to say the CPU of your ebike.
The controller manages the voltage & amperage through the sensors & firmware so it controls every function of your electric bike.
It takes the electricity source from the battery, calculates its votages amps then distributes it to your ebike parts.
Check this two Minuets video for more info.
Testing Ebike Controller At Home
As a general rule, you can test your ebike controller by measuring the resistance of the MOSFETs inside the controller. you can tell that your controller is working normally if there is no short between the MOSFETs and the two battery lines.
There are two measuring methods that you can do at home.
- Multimeter Test
- Ebike tester method
Testing Ebike Controller by Multimeter.
In this method, you will need a digital multimeter that has either resistance measurement or continuum feature.
if your multimeter has a resistance measurement feature & you will use it during the test then you can consider any wire of your controller that has more than 8 kilohms as a working line & has no issues.
However, if you will use the continuum feature then you will hear a peep from the multimeter if there was a short.
Continuity test Meaning if the two parts are electrically connected which is in our case means that there is a short.
Resistance Test Meaning how much is the resistance for the flow of electrical current.
Check out this amazing Multimeter, I love & I think everyone should have it (Get it on Amazon From Here)
Now let set up your Multimeter for testing.
- Make sure that the black probe is connected to the negative terminal which will be labeled as COM & the red Prob is connected to the positive terminal labeled as VΩmA
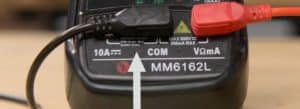
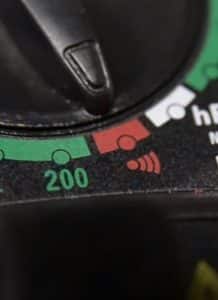
- To set your Multimeter for continuity test turn it to the button that has a sound wave sign.
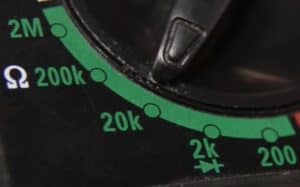
- To set your Multimeter to Resistance measurement turn your multimeter to this sign Ω & choose a low resistance
As we are now ready to test let’s get started.
To test your controller fast I suggest that you test one battery line with all the other lines of the controller first then test the second line with the other lines.
Step-by-step testing.
Turn on your multimeter.
Set it to continuum mode which I prefer as it will tell you if there is a short by giving a peep
Connect the black multimeter probe to the negative line of the battery.
Start testing every line coming out from the controller.
Please note that every line may have more than one cable so make sure to test every cable

If you heard a peep sound this means that you have a short in this line.
Now Connect the black Probe to the positive line of the battery & test every single line coming out of it.
To measure the resistance.
Set the multimeter to resistance mode
Start the same testing steps we did in the continuity test but the difference here is that you will read all the numbers that appear on your screen of multimeter for every cable
Your benchmark is 8 kilohms if you find any reading below this number means that this line has damage & not working probably
Testing Ebike Controller using ebike Tester
The best thing to use an ebike tester is that you will not only be able to test the controller but also you will test all the parts of your ebike.
there are a lot of ebike testers on the market & also a lot of manufacturers has their own testers so better to check if your ebike manufacturing has a special tester for his models.
Now Let’s get started.
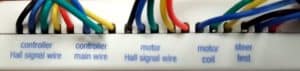
Ebike tester will allow you to test the controller hall signal wire, controller main wire, motor hall signal wire, motor coil, and throttle
How to perform the controller test using an ebike tester
- First, take the controller out from the ebike.
- take the throttle connection out from the ebike & connect it to the controller, we do this to see if the controller will be able to handle the orders from the throttle
- Now connect the tester controller wires to your ebike controller
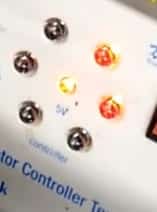
- Turn the tester ON
- start turning the throttle on
- if you find the tester lights blinking this means its working
- if you find the middle light only lighting this means the controller is having an issue.
I Got this tester from amazon for 21$ I really liked it’s very easy & worked perfectly for more than one year now.
you can check it Here
If you test your controller and find no issue but you suspect it’s a software issue you can check our guide for how to factory reset ebike controller from Here
Conclusion:
As a general rule, you can test your ebike controller at home using either a multimeter or an ebike tester.
For Multimeter testing, you can do two tests Continuity test which will show you if you have a short by peep, or a Resistance test which will measure how much is the resistance and you can know there is damage if the reading was less than 8 kilohms.
For the Ebike test, you will find out if your ebike controller has an issue if only the middle light was lighting but if the controller working the five lights will keep blinking.
Finally,
Thank you for visiting our website, If you find this post is helpful please feel free to use the social buttons below to share it with your friends.
Useful Posts for Ebike Controler Maintenance.
How Do You Shunt Mod An Ebike Controller? (Answered) This post is a step-by-step guide to MOD your Ebike Controller.
Why is my ebike going backwards? (Answered) explain the reason why ebike can go backward due to ebike controller cabling issue
How to Solve ebike Controller Overheating? (Answered) the reason why ebike controllers overheat & solutions to avoid overheating
